How to Start Clipping in 2026: The No-Fluff Beginner's Playbook
Everything a new clipper needs in 2026: picking a niche, getting permission, finding moments, editing for vertical, posting without getting flagged, and landing your first paid clip.
By the Salvo Team
7 min read
Updated
On this page
- What a clipper actually does
- Step 1: Pick a lane before you pick software
- Step 2: Get permission (it's a feature, not a formality)
- Step 3: Set up your accounts the boring, correct way
- Step 4: Learn to find moments fast
- Step 5: Edit for the phone, not the timeline
- Step 6: Post on a schedule and keep score
- Step 7: Land your first paid clip
- The 2026 beginner's checklist
Clipping is the job of turning long videos (streams, podcasts, interviews, YouTube videos) into short vertical posts for TikTok, YouTube Shorts and Instagram Reels. Creators want it because short-form is where new viewers find them. Brands want it because a clip with a real moment in it beats most ads. And clippers want it because it's one of the few online skills where you can start with a laptop and get paid on results.
It is also crowded, and the platforms have become much stricter about lazy reposting. This guide is the version we wish someone had handed us: what clipping actually involves in 2026, what to set up on day one, and the habits that separate clippers who get paid from the ones who quit after two weeks.
What a clipper actually does
A good clipper does four jobs, in this order:
- Finds the moment. Out of three hours of footage, there might be eight stretches worth posting. Spotting them fast is most of the skill.
- Cuts it tight. Starts on the first interesting word, not three seconds before it. Ends on the payoff, not after the laugh dies.
- Makes it work on a phone. Vertical framing, readable captions, a hook on screen in the first second.
- Gets it seen. Writes the caption, posts at the right time on the right accounts, watches what happens and adjusts.
Notice that "editing" is only one of the four. Beginners obsess over transitions and fonts. Experienced clippers obsess over picking the right 40 seconds and getting the first line right.
Step 1: Pick a lane before you pick software
You'll get better faster if you clip one kind of content. A few lanes that work:
- Streamers (Twitch, Kick, YouTube Live). Huge volume of footage, chat reactions that tell you where the moments are, and many streamers actively want clippers.
- Podcasts and interviews. Clean audio, quotable lines, and topics that travel well beyond the show's audience.
- Educators and business creators. Fewer "funny moments", more "one idea explained well". These clips often get saved and shared, which helps them keep getting recommended.
- Sports and gaming commentary. Fast-moving, but watch rights carefully: league and publisher footage has its own rules.
Pick a lane where you'd watch the long-form anyway. You will be watching a lot of it.
Step 2: Get permission (it's a feature, not a formality)
Clipping someone else's content without permission is the fastest way to get strikes, demonetized accounts and no repeat business. The good news: many creators want clips and say so. Look for:
- A clipping program or campaign the creator runs (often on Whop or in their Discord).
- Explicit permission in the creator's About page, stream panels or pinned posts.
- A direct deal: you message the creator or their manager, offer a few free sample clips, and agree on terms.
Write the permission down, even if it's a Discord message. If a platform ever asks, you want to show it.
Step 3: Set up your accounts the boring, correct way
- Start with one account per platform, branded around the lane or the creator you clip for (with their blessing).
- Fill in the profile. A clear name, a bio that says what the page posts, and a link back to the creator. Clip pages that credit the source get more goodwill from both creators and viewers.
- Use the platforms' own apps on a real phone for the first week. Watch the feed you're posting into. You'll learn more about pacing from 30 minutes of scrolling than from any tutorial.
- Don't buy followers or views. Paid clipping campaigns only count legitimate views, and bot views will get you removed from them.
Step 4: Learn to find moments fast
This is where most of your time goes, so it's where tools help most. Signals that a moment is worth clipping:
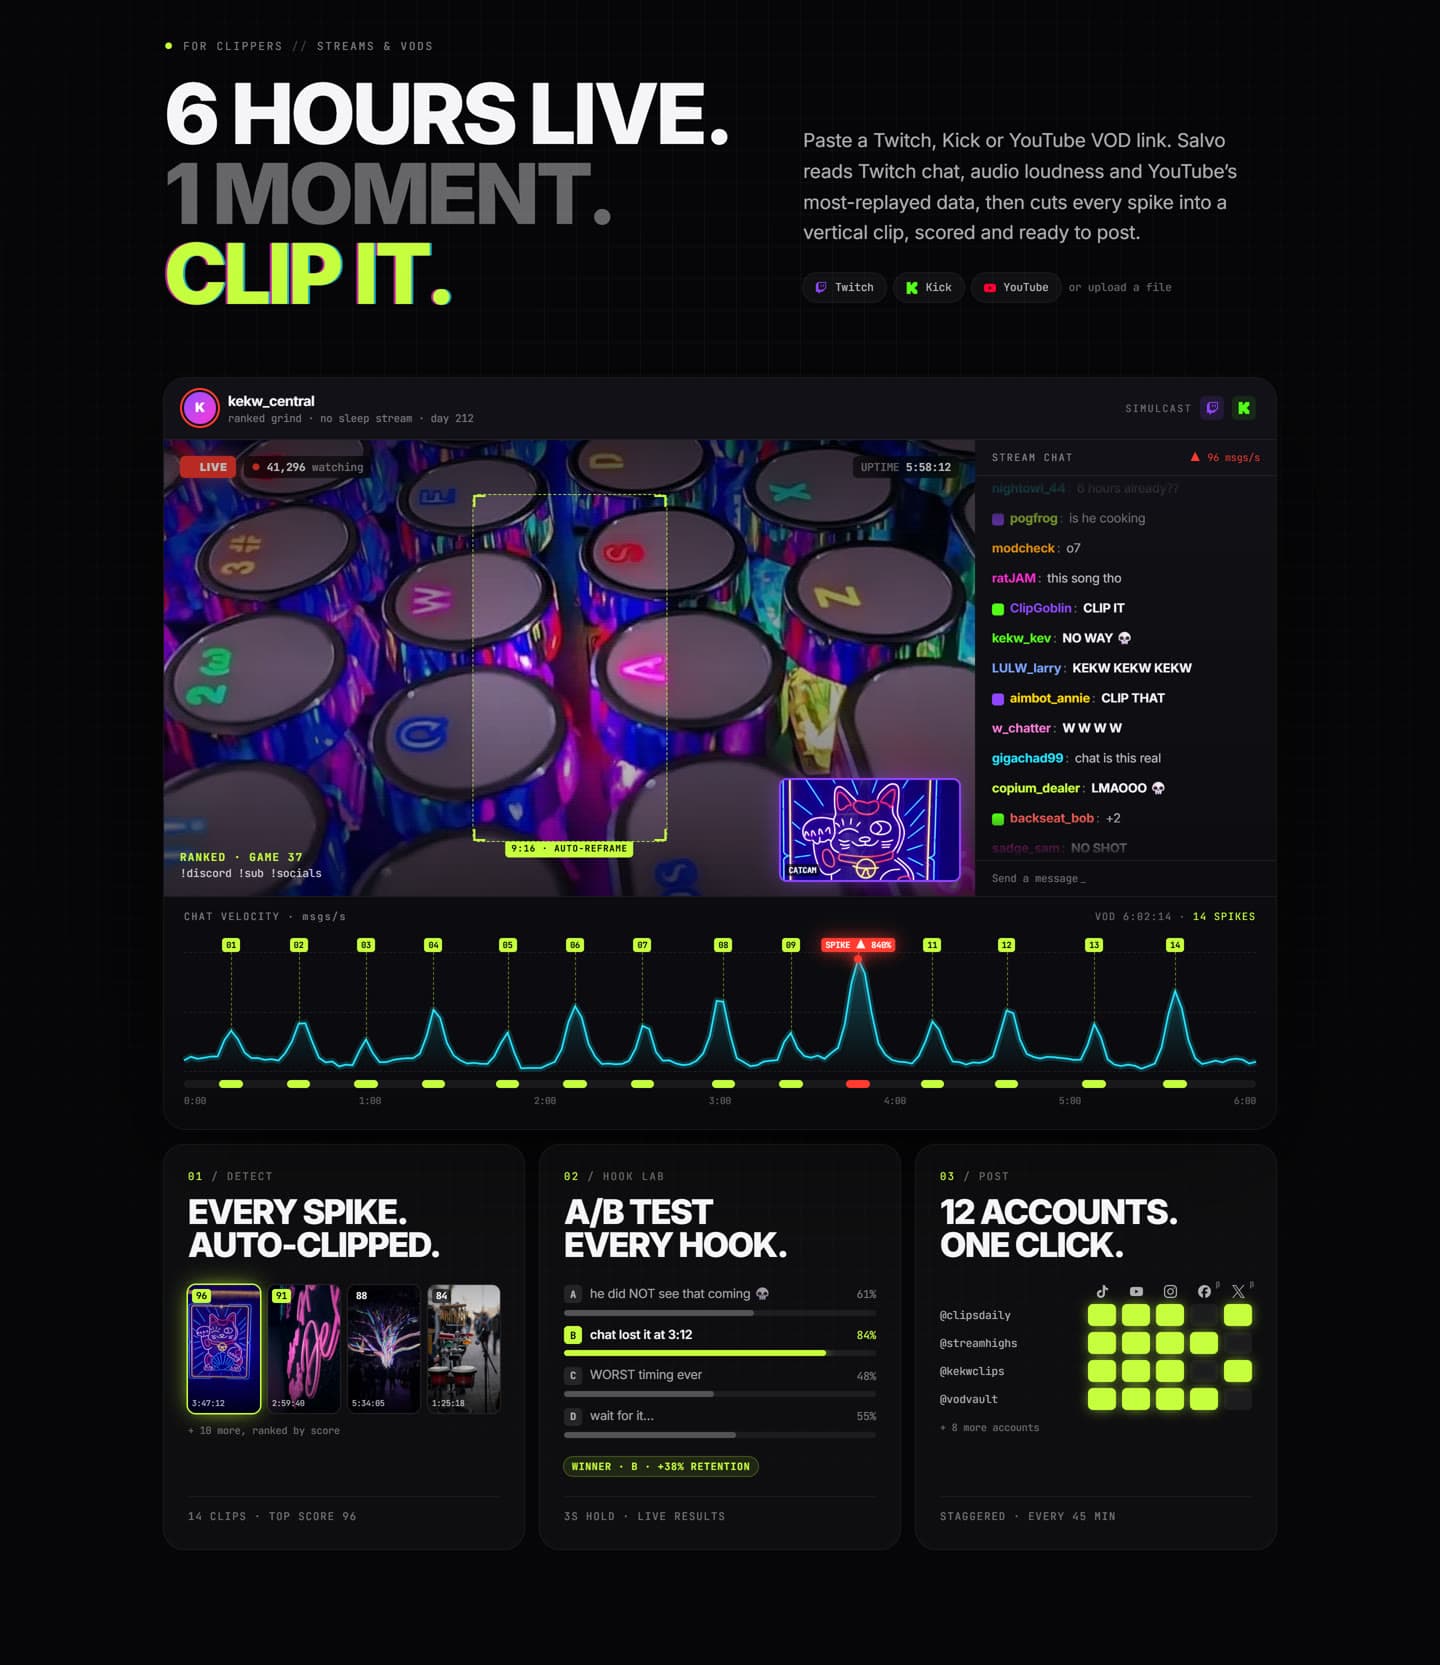
- Chat spikes. On a stream, a sudden flood of messages ("CLIP IT", "NO WAY", emote spam) is the audience telling you where to look.
- Volume jumps. Laughing, shouting, a sudden silence after a reveal.
- Most-replayed data. On YouTube, the "most replayed" graph above the timeline shows which parts viewers rewatched.
- Quotable sentences. For podcasts, a line that makes sense with zero context and makes someone want to argue or agree.
Doing this by hand means scrubbing through hours of footage. Salvo does the first pass for you: paste a Twitch, Kick or YouTube link (or upload a file) and it reads Twitch chat, loudness and YouTube's most-replayed data, transcribes the speech, and cuts each spike into a vertical clip with a score.
Step 5: Edit for the phone, not the timeline
Rules of thumb that hold across TikTok, Shorts and Reels:
- Start on motion or a line. No intros, no logo stings, no "so basically".
- Put the hook on screen. A short text line at the top that tells people why to keep watching. (We wrote a whole guide on hooks.)
- Captions always. A lot of people scroll with the sound off. Big, high-contrast, a few words at a time.
- Frame the face. For streams, stack the facecam over the gameplay instead of shrinking a 16:9 frame into a vertical box.
- Keep it as long as the moment, no longer. YouTube Shorts and Instagram Reels both allow up to three minutes now, but that doesn't make three minutes the right length. Most clips are 20 to 60 seconds because that's how long the moment is.
Step 6: Post on a schedule and keep score
Consistency beats bursts. A steady rhythm (say two or three clips a day per account) teaches you more than dumping fifteen clips on a Sunday. Spread posts out so you're not competing with yourself, and keep a simple log: clip, hook, post time, views at 24 hours, average watch time.
After two weeks, patterns appear. Maybe question hooks beat statements for your audience. Maybe clips under 30 seconds do better. That log is how you stop guessing.
If you're running more than a couple of accounts, a scheduler that staggers posts automatically saves hours a week. In Salvo you pick the clips and accounts, set a gap (15 minutes to 3 hours) and it lays out the week.
Step 7: Land your first paid clip
Once you have 20 to 30 clips posted and a few that did well, you have a portfolio. From there:
- Join a per-view campaign. Platforms like Whop's Content Rewards let brands and creators post campaigns that pay a set rate per 1,000 views on approved clips. It's the easiest way to get paid without negotiating. We break down the numbers in how clippers get paid.
- Pitch a creator directly. Send three finished clips, the views they got, and a simple offer (for example, a set number of clips a week for a monthly fee).
- Find the communities. Most clipping work is found in Discords, Whop and on X. See where clippers hang out.
The 2026 beginner's checklist
- One lane, one creator or topic you genuinely watch.
- Written permission for everything you clip.
- One account per platform, fully set up, with credit to the source.
- A fast way to find moments: chat spikes, loudness, most-replayed, quotable lines.
- Vertical framing, captions, an on-screen hook in the first second.
- A posting rhythm and a log you actually check.
- A portfolio of 20+ clips before you pitch.
None of this needs expensive gear. It needs reps. The clippers who win in 2026 aren't the ones with the flashiest edits. They're the ones who post good clips every day, look at the numbers, and get a little better each week.